
Introduction:
In the fast-paced world of technology, smartphones have become an integral part of our daily lives. However, an unexpected crack on the screen can turn our beloved devices into a source of frustration. Fear not! This comprehensive guide will walk you through the step-by-step process of replacing and fixing a cracked screen on your Samsung phone, empowering you to take matters into your own hands and save on repair costs.
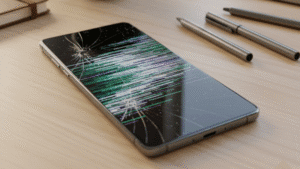
Section 1: Assessing the Damage Before diving into the repair process, it’s crucial to assess the extent of the damage. Determine whether the cracks are limited to the screen or if the underlying components are affected. This assessment will help you decide whether a DIY repair is feasible or if professional intervention is required.
Section 2: Gathering the Necessary Tools and Parts To embark on this repair journey, you’ll need the right tools and replacement parts. A comprehensive toolkit for smartphone repair typically includes a set of precision screwdrivers, plastic opening tools, spudgers, tweezers, and a heat gun. Additionally, purchase a high-quality replacement screen compatible with your Samsung model. These tools and parts can be easily sourced online.
Section 3: Creating a Workspace Set up a clean and well-lit workspace to ensure a smooth repair process. Arrange your tools in an organized manner, and use a magnetic mat or containers to keep track of small screws. A clutter-free workspace will reduce the chances of losing crucial components during the repair.
Section 4: Backing Up Data Before initiating any repair, it’s wise to back up your data to prevent potential loss. Connect your Samsung phone to a computer and transfer essential files, photos, and contacts. This precautionary step ensures that your personal data remains intact throughout the repair process.
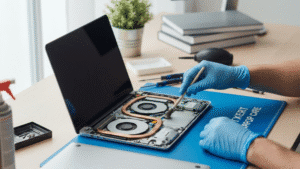
Section 5: Disassembling the Samsung Phone Begin the disassembly process by removing the back cover, battery, and any other removable components. Use the precision screwdrivers and plastic opening tools to carefully pry open the phone casing. Follow a reliable online guide or video tutorial specific to your Samsung model to avoid causing further damage.
Section 6: Removing the Cracked Screen Once you’ve gained access to the interior, focus on detaching the cracked screen. Apply gentle heat to the edges of the screen using a heat gun to soften the adhesive. Carefully use plastic opening tools to separate the screen from the frame. Exercise patience and caution during this step to avoid damaging the phone’s internal components.
Section 7: Installing the Replacement Screen Align the replacement screen with the phone frame and securely attach it using adhesive or screws, depending on your model. Take your time to ensure a precise fit, and double-check the connections to guarantee proper functionality. This step requires precision and attention to detail to avoid future issues.
Section 8: Reassembling the Samsung Phone With the new screen in place, reverse the disassembly process to reassemble your Samsung phone. Follow the same online guide or tutorial used during disassembly to ensure all components are correctly reattached. Pay close attention to screw placements and cable connections.
Section 9: Testing the Repaired Screen Before celebrating your successful repair, power on the phone and test the new screen thoroughly. Check for touch responsiveness, display quality, and any potential anomalies. This step ensures that the repair was executed successfully and that your Samsung phone is back in optimal working condition.
Explore top-notch Samsung phone repair services at your fingertips! Visit https://digimob.com.au/collections/samsung-repairs/ to effortlessly book professional repairs for your Samsung device. Quality service just a click away!
Section 10: Tips for a Successful DIY Repair To enhance your chances of a successful DIY screen repair, consider the following tips:
- Take your time: Rushing through the process increases the likelihood of mistakes.
- Stay organized: Keep track of screws and components to avoid confusion during reassembly.
- Watch tutorials: Follow detailed video tutorials or guides specific to your Samsung model.
- Use quality replacement parts: Invest in a high-quality replacement screen to ensure durability.
- Seek professional help if needed: If you feel overwhelmed at any point, don’t hesitate to seek professional assistance.
Conclusion:
Embarking on a DIY screen repair journey for your cracked Samsung phone is an empowering endeavor. By carefully following the steps outlined in this guide, you can revive your device and save on repair costs. Remember to approach the process with patience, precision, and the confidence that you have the tools and knowledge to bring your smartphone back to life. Happy repairing!