Your Phone Is Damaged – Now What?
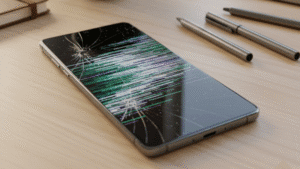
You pick up your phone and your heart sinks. There, it is a spiderweb of cracks spreading across the display panel, or worse, a completely black screen that won’t respond no matter how many times you tap, swipe, or press the power button.
Whether you’ve dropped your smartphone on concrete, sat on it accidentally, or the touchscreen simply stopped registering input out of nowhere, you’re not alone. Cracked glass, shattered LCD panels, and unresponsive digitisers are among the most frequently reported mobile device faults across Australia every single day.
The good news? Many screen damage and device failure issues have straightforward solutions you can attempt at home. Knowing the difference between a software glitch, a hardware fault, and a digitiser failure and understanding when professional screen replacement is the right call can save you time, money, and serious frustration.
This guide covers everything: root causes of screen damage, step-by-step repair troubleshooting, signs of internal component failure, and clear guidance on when a certified repair technician is your best option.
Why Do Screens Crack and Devices Stop Responding?
Understanding the underlying cause of your device problem is essential before attempting any fix. Mobile phone repairs go wrong when people treat symptoms rather than causes.
Physical impact damage is the most obvious culprit. A drop from waist height onto a hard surface generates significant shock force. Even with a protective case, the front glass panel, the LCD or OLED display layer, and the capacitive touch digitiser beneath it can all sustain damage simultaneously. The digitiser is the invisible sensor layer that detects your finger’s touch input fracture that layer, and your screen may display a perfect image while refusing to register any tap or swipe gesture.
Pressure and flexion damage is less obvious but surprisingly common. Sitting on your device, placing heavy objects on top of it, or bending it in a tight back pocket can cause LCD bleed, dead pixels, internal connector displacement, or partial display failure, often with no visible external crack on the glass.
Liquid and moisture intrusion play a sneaky role, too. Even devices marketed as water-resistant can suffer from moisture-related corrosion over time. Oxidation around screen connectors, the logic board, and internal ribbon cables can cause delayed touchscreen malfunction, display discolouration, or a completely unresponsive screen days after the initial liquid exposure.
Software crashes and firmware conflicts are frequently overlooked causes of unresponsive screens. A frozen application, a corrupted operating system update, or a driver conflict between system software and display hardware can lock your device entirely, mimicking the exact symptoms of physical screen damage when the hardware is perfectly intact.
Thermal stress and overheating are other contributing factors. When a device overheats from extended gaming sessions, a deteriorating battery, direct sunlight exposure, or faulty charging, the internal thermal management system can throttle performance or trigger an emergency shutdown, causing screen blackouts and touch input failure.
Battery degradation also directly affects display performance. A battery with significantly reduced capacity can cause sudden power drops, erratic screen behaviour, and intermittent touchscreen unresponsiveness, particularly during high-demand tasks.
Step-by-Step Troubleshooting: What to Try Before Seeking Repair
A forced reboot clears temporary system memory, stops frozen background processes, and resets the display driver without erasing any personal data. This is often the first step recommended in iPhone phone repairs.
Step 1 – Perform a Force Restart
A forced reboot clears temporary system memory, terminates frozen background processes, and resets the device’s display driver without erasing any personal data.
- iPhone 8 and later: Quickly press and release Volume Up, quickly press and release Volume Down, then hold the Side button until the Apple logo appears.
- iPhone 7 series: Hold the Volume Down button and Sleep/Wake button simultaneously for 10 seconds.
- Most Android smartphones: Hold the Power button and Volume Down together for 10 to 15 seconds until the device vibrates or restarts.
If the touchscreen becomes responsive again after a force restart, a temporary software crash or memory overflow was almost certainly the cause, not physical screen damage.
Step 2 – Update Your Operating System
An outdated OS version can introduce serious display rendering issues and touch sensitivity problems. If your device restarts successfully, navigate to Settings and check for pending system updates. Install available updates, then perform another restart to allow changes to take full effect.
Step 3 – Boot Into Safe Mode (Android Devices)
Safe mode disables all third-party applications and loads only core system software. If your touchscreen functions normally in safe mode, a recently installed app is interfering with your device’s display or touch input processing. Systematically uninstall recently added apps to identify and remove the problematic software.
To enter safe mode on most Android devices: hold the Power button, then long-press the “Power Off” option when it appears on screen until the Safe Mode prompt displays.
Step 4 – Inspect the Screen for Visible Damage Indicators
Carefully run your fingertip across the entire screen surface under good lighting. Look specifically for:
- Hairline cracks or spiderweb fracture patterns, including near screen edges
- Raised or depressed glass sections indicating internal separation
- LCD bleed – dark ink-like patches spreading beneath the glass surface
- OLED burn-in or persistent ghost images
- Dead zones -specific screen regions where swipe and tap gestures produce zero response
- Backlight bleed around screen borders
Documenting which areas of the screen still respond to touch input and which are completely non-functional is valuable diagnostic information when you do consult a repair technician.
Step 5 – Assess Battery Health and Charging Function
A critically degraded battery is a common hidden cause of screen blackouts and unresponsive display behaviour. Connect your device to a verified working charger using an undamaged charging cable and allow it to charge for at least 30 minutes before attempting to power it on.
If the device only functions while connected to external power, battery cell replacement rather than screen repair may be the primary fix required.
Step 6 – Clean the Screen Surface
Accumulated skin oils, fine dust particles, and surface moisture can significantly interfere with capacitive touchscreen sensitivity. Using a clean, dry microfibre cloth, gently wipe the entire screen surface in circular motions. Avoid household cleaning products, alcohol wipes (unless specifically rated safe for oleophobic screen coatings), or abrasive materials that can scratch the display glass.
Step 7 – Perform a Factory Reset (Final Software Option)
If the device powers on, the display renders correctly, but the screen remains completely unresponsive to touch input despite all previous steps and you’ve ruled out physical damage a factory reset may clear a deep firmware corruption or persistent software conflict affecting the touch driver stack.
This step erases all device data. Only proceed if you have a verified recent backup stored in iCloud, Google Drive, or a local computer backup. On most devices, a factory reset is accessible through Settings under General Management, System, or a similar menu path.
When DIY Troubleshooting Isn’t Enough
There is a clear boundary between software-related display faults you can resolve independently and physical hardware damage that requires professional repair and genuine replacement parts.
Seek professional screen repair or device assessment when:
- The front glass panel has visible cracks, chips, or complete shattering
- LCD bleed, dead pixels, or persistent display artefacts are present
- The device has been submerged in or heavily exposed to liquid
- The touchscreen produces zero input response despite successful restarts and software troubleshooting
- Display output shows persistent colour distortion, vertical or horizontal lines, screen flickering, or a white screen
- The device fails to power on even when connected to a verified working charger and cable
- The screen physically separates from the device chassis, suggesting internal frame or adhesive damage
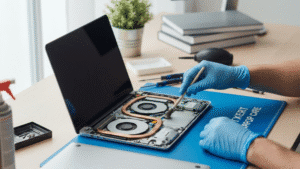
Attempting DIY screen replacement without professional-grade tools, compatible OEM or quality aftermarket parts, and technical knowledge of your specific device model risks causing additional damage, including tearing internal ribbon cables, damaging the logic board, or introducing new touch calibration faults. In most repair scenarios, professional screen replacement delivers better long-term outcomes and is significantly more cost-effective than full device replacement.
Frequently Asked Questions
Can a cracked screen cause further internal damage over time? Yes. Screen fractures create entry points for dust, moisture, and debris. Progressive contamination can corrode internal connectors, damage the logic board, and eventually cause faults well beyond the original screen damage if left unrepaired.
Q: Is it safe to continue using a phone with a cracked screen?
A: Short-term use is generally possible, but exposed glass edges present a physical injury risk, and a compromised digitiser layer will typically deteriorate further with continued use expanding non-responsive touch zones and worsening display integrity.
Q: Why is my touchscreen completely unresponsive when the display looks normal?
A: The capacitive digitiser layer, which detects touch input independently of the display layer, can sustain damage or connector failure without any visible effect on screen image quality. A visually perfect display can coexist with a fully non-functional touch sensor.
Q: How long does professional screen replacement typically take?
A: For most common smartphone models, a professional screen replacement, including digitiser and glass, is completed within 30 to 60 minutes by an experienced technician.
Q: Will my personal data be affected during a screen repair?
A: A screen replacement procedure alone does not require accessing, modifying, or wiping your device data. A reputable repair technician will not need to perform a data reset as part of standard screen repair work.
Q: Can a software update cause touchscreen malfunction?
A: Yes. In some cases, incomplete or corrupted system updates can introduce conflicts with touch input drivers or display rendering processes. Rolling back the update or performing a factory reset typically resolves software-induced touch faults.
Get an Expert Assessment in Adelaide
If you’ve worked through every step above and your screen remains cracked, your display is still rendering incorrectly, or your touchscreen continues to register no input, it’s time for a hands-on professional assessment.
Digimob provides mobile phone repairs in Adelaide, South Australia, with experienced technicians skilled in screen replacement, digitiser repair, LCD and OLED display restoration, and full device diagnostics across all major smartphone brands and models. If you’re based anywhere in Adelaide and dealing with a damaged or unresponsive device, a no-obligation assessment is the sensible next step.
A cracked screen or unresponsive display doesn’t automatically mean your device is beyond saving. With an accurate diagnosis and quality repair work, most smartphones are fully restored and back in your hands faster than you’d expect.