Accidents happen, and one of the most common mishaps with smartphones is a cracked or broken screen. Whether it’s a small crack or a completely shattered display, a damaged screen can be frustrating. Here’s a step-by-step guide to help you fix your broken Android screen.
Assess the Damage
Before jumping into repairs, take a moment to assess the extent of the damage. Is it just a minor crack or is the screen completely shattered? Can you still see and use the touchscreen functions? Understanding the severity will help you decide whether you can fix it yourself or need professional help.
Back-Up Your Data
If your phone is still functional, back up your data immediately. This ensures that you don’t lose any important information in case the screen damage worsens or during the repair process.
How to Back Up Your Android Phone:
- Connect to Wi-Fi.
- Go to Settings > System > Backup.
- Enable “Back up to Google Drive” and tap “Back Up Now.”
Temporary Solutions
While waiting for a permanent fix, here are some temporary solutions to keep your phone usable:
Use a Screen Protector
Applying a screen protector can prevent further damage and keep broken glass pieces in place. It’s a quick and inexpensive way to stabilize the screen.
Use Transparent Tape
If you don’t have a screen protector, a piece of transparent tape can also help. Carefully apply it over the cracks to hold the glass together and avoid cuts.
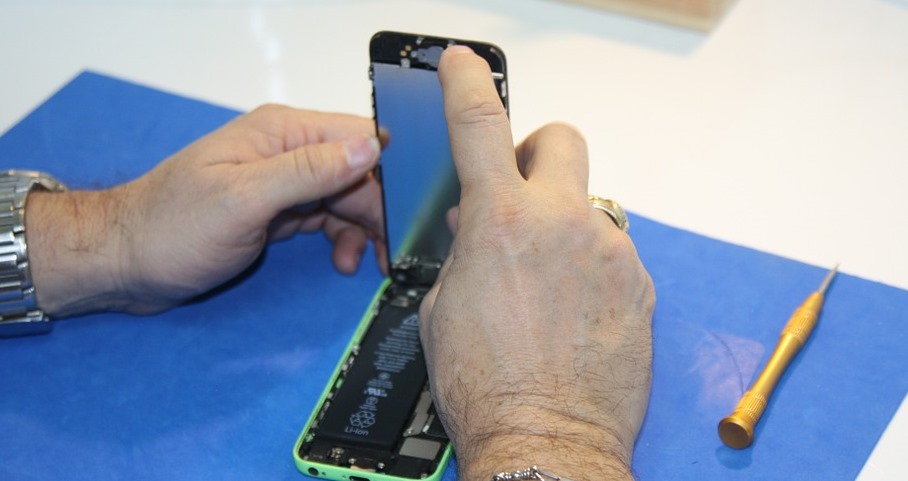
DIY Repair: Replacing the Screen
If you’re comfortable with DIY repairs, replacing the screen yourself can save money. Here’s a basic guide:
Gather the Necessary Tools
- Replacement screen (make sure it’s compatible with your phone model)
- Small Phillips screwdriver
- Plastic prying tools
- Suction cup
- Tweezers
Step-by-Step Instructions
- Power Off Your Phone:
Ensure your phone is completely turned off to avoid any electrical damage. - Remove the Back Cover and Battery:
Use the prying tools to carefully remove the back cover. Take out the battery if possible. - Unscrew and Remove the Old Screen:
Use the Phillips screwdriver to remove the screws holding the screen in place. Carefully disconnect any cables attaching the screen to the phone’s motherboard. - Attach the New Screen:
Connect the new screen to the motherboard and secure it with screws. Be gentle to avoid damaging the connectors. - Reassemble Your Phone:
Put the battery back in, reattach the back cover, and power on your phone. Check if the new screen is functioning correctly.
Professional Repair Options
If DIY repair seems too daunting or the damage is extensive, seeking professional help is the best option.
Local Repair Shops
Many local repair shops offer quick and affordable screen replacements. Make sure to check reviews and choose a reputable shop.
Manufacturer’s Service Center
If your phone is still under warranty, the manufacturer’s service center might be the best place for repairs. They use original parts and ensure quality work.
Prevent Future Damage
To avoid future screen damage, consider the following tips:
Use a Sturdy Case
A robust case can absorb shocks and prevent screen damage during drops.
Apply a Screen Protector
A tempered glass screen protector adds an extra layer of protection against scratches and cracks.
Be Mindful of Your Phone’s Location
Avoid placing your phone in your back pocket or in places where it can easily fall.
Considerations Before Attempting a DIY Repair
Before you decide to replace the screen yourself, consider a few important factors. First, ensure you have the right tools and a suitable workspace. A well-lit, clean area is essential to avoid losing tiny screws or damaging delicate components. Additionally, it’s crucial to understand that DIY repairs can void your phone’s warranty. If your phone is still under warranty or you have insurance, check the terms and conditions. Sometimes, attempting a repair yourself can lead to more damage, especially if you’re not familiar with the process.
The Importance of Using Quality Parts
When replacing the screen, always opt for high-quality, original, or OEM (Original Equipment Manufacturer) parts. Using cheap, low-quality screens might save you money upfront, but they can lead to problems down the line, such as poor display quality, unresponsive touch screens, or even more severe damage. Authentic parts ensure that your phone’s performance remains optimal and that the new screen is as durable as the original. Investing in quality parts can save you time, money, and hassle in the long run.
Exploring Warranty and Insurance Options
If you’re hesitant about performing a DIY repair, exploring warranty and insurance options is a smart move. Many smartphones come with a manufacturer’s warranty that might cover accidental damage, including screen repairs. Additionally, if you have insurance for your phone, it often covers repair costs for accidental damage. Contact your manufacturer or insurance provider to understand your coverage options. In some cases, using these services might be more cost-effective and ensure a professional repair job without the risk of voiding your warranty.
Final Thoughts on Screen Repairs
Fixing a broken screen on your Android phone can be a rewarding experience, whether you choose to do it yourself or opt for professional help. By assessing the damage, backing up your data, and taking preventive measures, you can mitigate the inconvenience caused by a broken screen. Remember, the key to a successful repair is preparation and patience. Weigh your options carefully, and choose the solution that best fits your skills, budget, and comfort level. With the right approach, you can restore your phone’s functionality and continue enjoying its features without interruption.
Conclusion
A broken screen doesn’t mean the end of your Android phone. Whether you opt for a DIY repair or seek professional help, there are various ways to fix it. Remember to back up your data, assess the damage, and take preventive measures to avoid future incidents. With a little effort, you can have your phone looking and functioning as good as new.
Do you have gadget glitches? No worries! 🛠️ From laptops 🖥️ to iPhones 📱, MacBooks 💻 to iPads, and even Samsung, Android phones, and all other major brands, we’ve got you covered! 💼 Our team offers swift and reliable repairs for all your digital needs. 🚀 Visit digimob.com.au today!
FAQs: Fixing a Broken Screen on Your Android Phone
1. Can I fix my broken Android screen myself?
Yes, you can fix your broken Android screen yourself if you have the right tools and a replacement screen compatible with your phone model. DIY repairs can save money but require careful attention to detail and a basic understanding of smartphone components. Online tutorials and step-by-step guides can be helpful.
2. How much does it cost to repair a broken screen?
The cost to repair a broken screen varies depending on your phone model and where you get it repaired. DIY repairs might cost between $50 to $150 for the replacement screen and tools. Professional repairs can range from $100 to $300, with higher-end models potentially costing more.
3. Will a cracked screen get worse over time?
Yes, a cracked screen can worsen over time. Cracks can spread, and the underlying components can be exposed to dust, moisture, and further damage. It’s advisable to fix a cracked screen as soon as possible to prevent more significant issues and potential data loss.
4. What should I do if my touch screen is unresponsive after the repair?
If your touch screen is unresponsive after a repair, ensure all connectors are securely attached and that no cables are damaged. Recheck the installation steps to ensure nothing was missed. If the problem persists, it could be a faulty replacement screen or an issue with the phone’s internal components. Consider seeking professional assistance if you’re unable to resolve the issue.
5. How can I protect my screen from future damage?
To protect your screen from future damage, use a sturdy phone case that offers good protection against drops and impacts. Apply a tempered glass screen protector to safeguard against scratches and minor impacts. Additionally, be mindful of where you place your phone and avoid keeping it in places where it can easily fall or get damaged.